• Skip to primary navigation
  • Skip to content
  • Skip to primary sidebar

Slice Of Honey logo

  • Home
  • About
  • Contact
  • breakfast
  • Dinner
  • Side Dish
  • Dessert
  • Other
  • All Recipes

Recipe

SHEET PAN DINNERS FOR BUSY WEEKNIGHTS

September 3, 2019 by Sarah Baade 1 Comment

People often think that as a food blogger, I must have it all together in the kitchen. They assume my meals are always planned ahead of time. That I choose healthy options and only indulge occasionally. That dinner is easy to prep regardless of any other activities going on. These assumptions are completely off base. I certainly do enjoy cooking. Why else would I do a food blog? However, dinner at my house is often as last minute as any other household. I reach for convenient foods as often as I do healthy foods. I get in food ruts and end up fixing the same meals every week for a month. My biggest struggle is honestly just getting to the grocery to even pick up any ingredients. What is your biggest struggle for getting dinner on the table? I would genuinely love to hear from you on this.

I’ve met and follow some incredible people through food blogging. One of the things I love most about this community is the support people provide. Blogging is always a work in progress. We work to improve our recipes, our writing, our photography, our styling. My fellow food bloggers understand every aspect of what goes into creating a post. When you start following someone closely, you see their progress. We cheer each other on. We congratulate one another when we see something inspiring. We sympathize when struggles hit us in the kitchen. It is a wonderful thing to have companionship in this space.

Weeknights are about to get easier. For this post, I’ve collaborated with eight of my favorite food bloggers to create sheet pan dinners. I love sheet pan dinners because of how easy they are to make but also how easy they are to clean up. With the school year now in full swing, everyone has a busier schedule and could use an easy dinner recipe. I have been blown away by the variety and creativity in this project. A huge thank you goes out to each and every collaborator for helping me put this together. I hope that you’ll stop by their sites and check out more recipes from these incredible food bloggers!

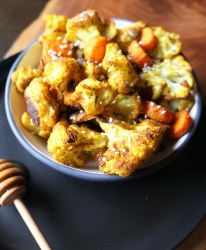
SHEET PAN BBQ CHICKEN MEATBALLS & VEGGIES

Created by Laura at Ways To My Heart
https://www.waystomyheart.com/sheet-pan-bbq-chicken-meatballs-veggies/

CURRIED PORK CHOP AND POTATO SHEET PAN RECIPE

Created by Nicolas at Blogtastic Food
https://www.blogtasticfood.com/curries-pork-chop-sheetpan-recipe/

SHEET PAN GNOCCHI AND SAUSAGE

Created by Mansee at One Girl. One Kitchen.
https://www.onegirlonekitchen.com/sheet-pan-gnocchi-and-sausage/

SHEET PAN HARISSA CHICKEN WITH BROCCOLINI AND CHICKPEAS

Created by Indi at With Spice
https://www.withspice.com/blog/sheet-pan-harissa-chicken-with-broccolini-and-chickpeas

DUKKAH AND PARMESAN CHICKEN TRAY BAKE

Created by Teresa at Cupcakes and Couscous
https://cupcakesandcouscous.com/2019/08/28/dukkah-and-parmesan-chicken-tray-bake/

SHEET PAN CHICKEN FAJITAS

Created by Melissa at Keeping it Simple
https://keepingitsimpleblog.com/food/dinner/sheet-pan-chicken-fajitas/

EASY SHEET PAN DINNER WITH SAUSAGE, POTATOES & VEGGIES

Created by Julia at Julia Recipes
https://juliarecipes.com/2019/08/30/easy-pan-sheet-dinner-with-sausage-potatoes-veggies/

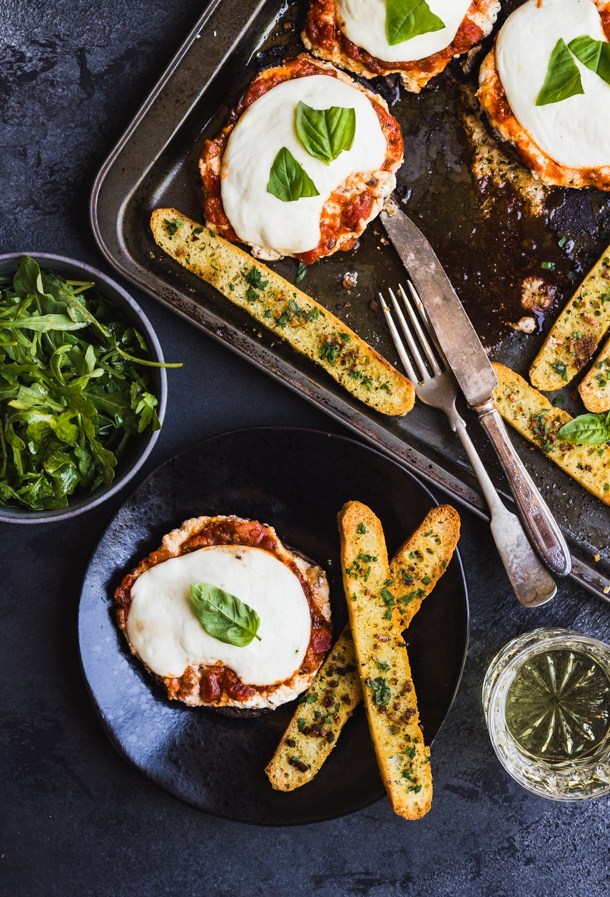
SHEET PAN ITALIAN MUSHROOMS AND GARLIC BREADSTICKS

Created by Will at Hangry White Male
https://www.hangrywhitemale.com/sheet-pan-italian-mushrooms-and-garlic-breadsticks/

SHEET PAN SHRIMP FAJITAS

Created by Sarah at Slice of Honey
https://sliceofhoney.com/2018/10/12/sheet-pan-shrimp-fajitas/

Filed Under: Entree, Recipe, Uncategorized Tagged With: Dinner, Easy Dinner, Easy Recipe, Home Cooking, Meal, Sheet Pan Dinner, Sheet Pan Meal, Weeknight Dinner

MY FAVORITE CHOCOLATE CHIP COOKIES

August 14, 2019 by Sarah Baade Leave a Comment

I promise I’ve been trying to focus on healthy recipes. In fact, I have a few waiting in the wings for the blog. However, sometimes I get distracted by sweets. Let me be honest here, chocolate chip cookies are typically not my jam. I mean, I’ll still eat one if that’s what’s available – let’s be reasonable, there’s still chocolate involved. But if I have other options, I will pick almost any other cookie on any given day. Maybe I’ve just had too many super plain tasting chocolate chip cookies in my day? I know you know what I’m talking about. Something mass produced for a cafeteria. Something lacking flavor and or quality chocolate.

Given my history with this all-American cookie, it is a wonder I was craving them the other night. I saw a friend post some chocolate chip cookies in her Instagram stories and I just couldn’t get them out of my head. So, I did it. I made some cookies from scratch and THANKFULLY wrote the recipe down as I created it. My cookie loving world has been forever changed! I’m going to make a big statement here and people will might try to argue with me (I’ll be respectful of your opinions if you’ll respect mine). These cookies turned out to be the best chocolate chip cookies I’ve ever had. I know you love your grandma’s recipe but I feel like that is only because you haven’t tried these yet. Bonus? They are still simple to make!!! Be sure to eat one (or four) while they’re still warm from the oven. You can thank me later.

Tips

  • The toffee bits add a beautiful sweetness that is different from the chocolate chips. However, if you’re serving these to friends who have a nut allergy, please leave them out.
  • Quality ingredients do make a difference in the cookie, especially when it comes to the chocolate. This recipe is the perfect reason to splurge a little and get the more expensive chocolate chips.
Chocolate chip cookies with a glass of milk.

My Favorite Chocolate Chip Cookies

Slightly crisp outside, slightly chewy inside. A perfectly balanced chocolate chip cookie.
Print Recipe Pin Recipe
Course Dessert
Cuisine American
Servings 18 cookies

Ingredients
  

  • 1 1/2 cups all-purpose flour
  • 1/4 teaspoon salt
  • 1 teaspoon baking soda
  • 1/2 cup unsalted butter, softened
  • 1/2 cup granulated sugar
  • 3/4 cup packed light brown sugar
  • 1 large egg
  • 1 teaspoon vanilla extract
  • 3/4 cup semisweet chocolate chips
  • 1/3 cup 60% cacao bittersweet chocolate chips
  • 1/3 cup toffee bits

Instructions
 

  • Preheat oven to 350°F. Line a cookie sheet with parchment paper.
  • In a medium bowl, whisk together flour, salt and baking soda.
  • In a separate large bowl, beat butter with granulated sugar and brown sugar.
  • Mix eggs and vanilla into butter mixture.
  • Gradually stir in flour mixture until all ingredients are fully combined.
  • Stir in chocolate chips and toffee.
  • Scoop cookie dough into golf ball sized balls and place onto parchment lined baking sheet. Leave 2 ½ inches between cookies. Bake 15 to 17 minutes or until edges start to turn golden brown. Remove cookie sheet from oven and transfer the cookies from the parchment to cooling racks.

While these are certainly my favorite chocolate chip cookie, I understand that people have strong preferences when it comes to such a classic cookie. If you prefer soft batch, I’ve got you covered. You can check out my soft batch chocolate chip cookies here.

Filed Under: Recipe Tagged With: Best chocolate chip cookie recipe, Best cookie recipe, Best cookies, Chocolate, Chocolate Chip Cookies, Chocolate Chips, Cookies, Dessert, Favorite Cookies, Food blog, Food photography, Food Styling, Homemade chocolate chip cookies, Homemade Cookies, My favorite chocolate chip cookies, Warm cookies

KALE SALAD with LEMON VINAIGRETTE

July 31, 2019 by Sarah Baade 2 Comments

What is your go-to when you really don’t want to cook? Maybe I should back up a bit. What are the staples in your fridge or pantry? The items you know you can always make a meal out of in ten minutes or less? My staples include kale (don’t roll your eyes at me), chickpeas, tortillas and eggs. At my laziest, I will toss together a kale salad. The toppings vary as far as which cheese or seeds I might sprinkle on top but I always include chickpeas for protein. My other go-to quick meal option is a breakfast taco. I live in South Texas and down here, there is no room for not loving breakfast tacos.

I get it that there are plenty of people who don’t like kale. Heck, there are plenty to mock it and shout their hate for kale from the rooftops. However, I think those people either haven’t actually tried it OR it wasn’t prepared well for them. In raw form, it can be really tough and fibrous. If the stem isn’t removed, you’ll feel like you’re gnawing on a tree branch. HOWEVER, if prepared well, it is delicious and has lots of nutritional value. At the very least, it is worth trying. If you still don’t like it? Hey, more for me!

Tips

  • I created this recipe as a side salad. However, you can top it with chickpeas, a hard-boiled egg or even grilled chicken to turn it into a meal.
  • To make this recipe go even faster, you can use a store-bought vinaigrette instead of the one I created for this salad.

Kale Salad with Lemon Vinaigrette

My go-to salad recipe – perfect as a side salad or turn it into your main dish.
Print Recipe Pin Recipe
Course Salad

Ingredients
  

  • 5 large handfuls kale, destemmed and torn into pieces
  • zest of 1 lemon
  • 1/4 teaspoon salt
  • 1/4 cup shaved parmesan cheese
  • 2 Tablespoons roasted & salted pepita seeds
  • 1/2 teaspoon crushed red pepper flakes

For the Vinaigrette

  • juice of 1 lemon
  • 3 Tablespoons olive oil
  • 1/2 teaspoon sugar
  • 1 teaspoon dijon mustard
  • 1 pinch salt
  • 1 pinch ground black pepper

Instructions
 

  • Place kale, lemon zest and salt in a large pan with 1 tablespoon of water. Sauté 2-3 minutes or until kale is bright green and slightly tender. Remove from heat immediately and put kale in a medium bowl.
  • Toss kale with pepitas, parmesan and red pepper flakes until ingredients are evenly distributed.

For the vinaigrette

  • For the vinaigrette: whisk together all ingredients in a small bowl. Drizzle over salad as desired.

Filed Under: Recipe Tagged With: Dinner, Easy Recipe, easy salad, Healthy Food, Healthy Option, healthy recipe, healthy side dish, kale, kale salad, lemon vinaigrette, Pepitas, salad, Side Dish, Vegetarian

BLACKBERRY CHEESECAKE NO CHURN ICE CREAM

July 14, 2019 by Sarah Baade 7 Comments

I have lived in several states during my adult life – Kansas, Missouri, New York, Colorado, California, Texas. Most places I’ve lived were simply because I felt like moving and exploring a new city/state. However, my journey to Western New York is a little different. Deciding to pursue a degree in Audiology required me to look outside of my home state of Kansas. At the time, there were no doctoral programs in Kansas – that has changed since then. As I was filling out grad school applications, I was initially drawn to places with a nice climate or places where I already had friends. I had a huge stack of applications and most of them were not distinct from one another. However, I vividly recall grabbing the application to SUNY at Buffalo and thinking “Why would I want to live there?” as I tossed it into the garbage. I was getting burned out on completing applications and I had senioritis in a bad way. At some point, I realized that I should probably apply to just one more school – acceptance into specialty programs can be competitive and there are no guarantees. So, I browsed online and discovered SUNY at Buffalo had an incredibly easy online application. I filled it out and didn’t really think twice about it because I had full intention of attending one of the other schools on my list. I think we can all see where this is heading, right? Each school I applied to had a unique situation as to why I ended up not going there. I’ll spare you those details but yes, I ultimately ended up moving to Buffalo and completing my degree there.

I spent a total of six years in Buffalo and surrounding towns. There were ups and there were so many more downs. To be honest, I have a hard time looking back and seeing the high points but I know there were some good times had in the midst of it all. One thing that I do recall fondly, though, is the food. Buffalo wings, anyone?!?! But also, the pizza and sub sandwiches. And even better? Perry’s ice cream. Now living in Texas, Blue Bell is the go-to option in the stores. However, I’m convinced it is only because Perry’s is not available here. (Sorry, Blue Bell.) My all-time favorite flavor was blackberry cheesecake. It was only available occasionally, and only at the local ice cream stands. It was never available in the stores. But man, oh man, this was THE flavor for me! I haven’t found it in any other brand since then. Naturally, the next best thing was to create my own version. My friend, Nicolas, from Blogtastic Food challenged me to create a new no churn ice cream and I knew exactly what I wanted to make. I truly hope this no churn blackberry cheesecake ice cream gives you the same joy I experienced when I had the original from Perry’s back in the day.

Tips:

  • Be sure to cool the berry mixture before adding it into the whipped cream mixture so that it doesn’t melt the whipped cream.
  • Don’t sub out the homemade whipped cream for the premade stuff. There is a difference in texture and sweetness.

Blackberry Cheesecake No Churn Ice Cream

Sarah Baade
No Churn ice cream is easy to make – no ice cream maker needed. This blackberry cheese cake ice cream is the new favorite in our house.
Print Recipe Pin Recipe
Course Dessert
Cuisine American

Ingredients
  

  • 12 oz fresh blackberries
  • 1 teaspoon vanilla extract
  • 8 oz cream cheese
  • 16 oz heavy cream
  • 14 oz sweetened condensed milk
  • 1 9" premade graham cracker pie crust

Instructions
 

  • Stir blackberries in a medium pan over low heat until berries start to break down.
  • Stir in vanilla extract and cream cheese until cream cheese is melted and mostly incorporated with berries.
  • Remove berry mixture from heat and let cool to room temperature.
  • In a large, chilled bowl, beat heavy cream until soft peaks form.
  • Mix sweetened condensed milk into heavy cream until fully incorporated.
  • Add berry mixture into cream mixture and stir until fully incorporated.
  • Gently stir in entire graham cracker crust – do not fully incorporate the crust – chunks are fine here.
  • Pour ice cream mixture into a 9×5 loaf pan. Cover with plastic wrap and freeze for a minimum of 6 hours, preferably overnight.
Keyword Blackberry, Blackberry Cheesecake No Churn Ice Cream, Blackberry Ice Cream, Cheesecake, Cheesecake Ice Cream, Dessert, Easy Recipe, Ice Cream, No Churn, No Churn Ice Cream

More No churn Ice Cream Recipes

This recipe was developed as part of a collaboration with several other talented food bloggers. I am including the links to their recipes for you to try out as well.

  • Baileys & Salted Caramel No Churn Ice Cream by Nicolas at Blogtastic Food
  • Matcha Green Tea No Churn Ice Cream by Julia at Julia Recipes
  • Turmeric Ginger Honey No Churn Ice Cream by Loretto and Nicolleta at SugarLoveSpices
  • Churro S’mores No Churn Ice Cream by Jen at Real Food Happy Home
  • No Churn Peanut Butter Cup Ice Cream by Christine at The Rustic Foodie
  • Coconut Ice Cream with Spiced Chocolate Sauce by Rachel at Plant Craft
  • Cherry Chocolate chip Nice Cream by Leanne at Crumb Top Baking
  • No Churn Chocolate Brownie Ice Cream by Marie at Sugar Salt Magic

Bonus Recipe

You can also check out my own No Churn Chocolate Chunk Coffee Ice Cream here.

Filed Under: Recipe Tagged With: Blackberry, Blackberry Cheesecake No Churn Ice Cream, Cheesecake, Dessert, Easy Ice Cream, Easy Recipe, Ice Cream, No Churn Ice Cream

PARMESAN ASPARAGUS & TOMATOES

June 26, 2019 by Sarah Baade Leave a Comment

As some of you may know, I followed a pretty strict vegetarian diet for about a year in 2017-2018. I’ve loved vegetables for as long as I can remember so it wasn’t too far of a stretch for me to jump in completely. When I took the time to truly plan my meals, it was a relatively easy diet for me to follow and I truly enjoyed it. When I didn’t take that time to plan and prep though, it was rough. Every Wednesday night my husband and I join two other couples for what we call small group. Fellowship is probably a better word to describe these evenings. We share a meal, talk about Jesus and talk about life. I love our Wednesday nights and these friends are really more like family. However, cooking on those nights became stressful. I would make a dish for the non-vegetarian group of friends. Cook something for my daughter (who wasn’t eating with us or I would have served her the same thing). And after each of those, I was still cooking a vegetarian dinner for myself. It was too much. Too much to accomplish within a small window of time after work and before getting our group together. Ultimately, the diet wasn’t worth the cooking chaos and I started reincorporating meats into my routine. Perhaps down the road I will give it another go but right now it isn’t the right option for me.

I still enjoy cooking vegetarian based dishes at home when life isn’t too crazy though. This is why I have kept the blog as primarily vegetarian. I love the challenge and health benefits of keeping more plants on my plate than meats. Even when we go out to dinner I often choose a vegetarian option. One of my favorite things to do is to order a few different side dishes or appetizers and eat those as my dinner rather than ordering an entrée. I feel like I have more options that way. Plus, I feel like I get to try a wider variety of what the restaurant has to offer. With this in mind, I also enjoy making side dishes at home and claiming them as my main course. I discovered last week that I can eat about a pound of asparagus on my own. Sorry to my husband for not sharing, haha! This recipe is a new one for us but is so easy and tasty that it might very well make it to the usual rotation of favorite recipes.

Tips:

  • Feel free to swap out the grape tomatoes for whatever small sweet tomatoes you can find at your local store.
  • I highly recommend sticking with fresh herbs on this one. Dried herbs will not give the same fresh flavor.
Sauteed asparagus and tomatoes with parmesan.

Parmesan Asparagus & Tomatoes

A flavorful, savory side dish that is quick and easy to make.
Print Recipe Pin Recipe
Course Side Dish
Servings 4

Ingredients
  

  • 1 Tablespoon unsalted butter
  • 1/2 teaspoon garlic, minced
  • 1 lb asparagus, trimmed and cut into 1" pieces
  • 1/2 cup grape tomatoes, halved lengthwise
  • 1 teaspoon fresh oregano
  • 1 teaspoon fresh thyme
  • 3 teaspoons grated parmesan cheese
  • salt to taste

Instructions
 

  • Melt butter in a large skillet over medium heat. Add garlic and cook until fragrant, stir frequently. Add asparagus, stirring occasionally, and cook until slightly tender and starting to get char markings, about 5 minutes. Stir in oregano and thyme. Push asparagus to one side of the pan, place tomatoes on other side. Cook tomatoes until they soften slightly and start to get char markings, about 3 minutes. Add parmesan and salt, stir all ingredients together in the pan until well combined.
Keyword Asparagus, Easy Recipe, Side Dish, Tomatoes, Vegetables, Vegetarian Recipe

Filed Under: Recipe, Sides, Uncategorized Tagged With: asparagus, Easy Recipe, Easy Side Dish, healthy recipe, healthy side dish, Side Dish, Tomatoes, Vegetables, Vegetarian, Vegetarian Recipe

KEY LIME SUGAR COOKIES

June 2, 2019 by Sarah Baade 1 Comment

I used to make sugar cookies on the regular. I would do thick, soft, cut-out style cookies and then spend hours decorating them. If I’m honest, I made them in order to escape life’s stress. I was in a miserable, unhealthy relationship. Staying focused on the baking and decorating kept my mind at peace. I felt like I was in a situation that I couldn’t escape physically so I would do so mentally. Some people exercise to escape stress, some people turn to drugs or alcohol… I turned to baking. I did ultimately end that toxic relationship, got therapy and moved on to much happier times. It would be easy to resent those years but that would only keep me locked into the misery. Instead, I think of it as one of the most important life lessons I’ve ever had. I wouldn’t be in the incredible marriage I’m in today if I hadn’t experienced my past. I probably wouldn’t be as thankful as I am for the healthy, loving and supportive relationship I have with my husband.

My love for sugar cookies is still strong but I don’t spend hours baking and decorating unless I’m motivated to do so out of joy. “Escape baking” is a thing of my past.  Instead, I choose easier, less time-consuming recipes to satisfy a sugar cookie craving. With summer comes bright citrus – lemon and lime season. When I was looking to make some sugar cookies, I saw key limes sitting on my counter and knew I need to incorporate them. This recipe is easy to make, you don’t even need to chill the dough. Perfect for when you don’t want to wait all day to have a homemade cookie.

Tips:

  • If you can’t find key limes, go ahead and use regular limes or you could even swap out for lemon if you prefer.
  • I made the icing somewhat thick so I could manipulate it on the cookies. If you prefer a lighter icing, reduce the amount of powdered sugar.

Key Lime Sugar Cookies

A vibrant take on a classic cookie.
Print Recipe Pin Recipe
Course Dessert
Cuisine American
Servings 30 cookies

Ingredients
  

  • 2 cups all purpose flour
  • 1 teaspoon baking soda
  • 1 cup unsalted butter, softened
  • 1 cup sugar
  • 2 Tablespoons key lime zest
  • 1 egg
  • 1 teaspoon vanilla extract
  • 1/2 teaspoon salt

For the icing

  • 2 Tablespoons fresh key lime juice
  • 1 1/3 cups powdered sugar

Instructions
 

  • Preheat oven to 350°F.
  • In a medium bowl, whisk together flour and baking soda then set aside.
  • In a large bowl, cream together the butter, sugar and lime zest until light in color. Add in egg, vanilla and salt and beat to combine. Gradually add in flour mixture, stopping to scrape the bowl periodically.
  • Roll cookie dough into 1” balls then place on parchment covered cookie sheet, leaving 2 inches between cookies.
  • Bake 15-17 minutes or until edges are slightly golden. Let cookies cool completely before adding icing.

For the icing

  • For the icing: pour lime juice into a small bowl. Gradually whisk powdered sugar into lime juice until fully incorporated and smooth (no lumps). Spoon icing onto cookies as desired.
Keyword Cookies, Dessert, Easy Cookies, Easy Recipe, Homemade Cookies, Key Lime, Key Lime Cookies, Key Lime Dessert, Lime

Filed Under: Recipe, Uncategorized Tagged With: Cookie Recipe, Cookies, Dessert, Homemade Cookies, key lime, Key Lime Sugar Cookies, Lime, Sugar Cookies

PANZANELLA SUMMER SALAD

May 25, 2019 by Sarah Baade 1 Comment

Farmer’s Market Finds

When I first moved to Texas, I distinctly remember waking up at all hours of the night and checking the temperature. It was August and even at 3:00 in the morning, we were at 90°F outside. The low temperatures were in the 90’s!!! The highs were certainly hitting around 110°F. I grew up with hot summers in Kansas. Over the last few years though, I had been living in much colder climates in Western New York and then Colorado. I quickly learned how to cope with the heat though. Here in San Antonio, it is all about pool life with snacks and drinks in hand. There were a lot of antics that first summer. Fence hopping, trivia at a nearby hole in the wall, dancing at clubs downtown, plus lots of sangria and snacks by the pool. Every weekend, my friends and I would hit up the farmer’s market for fresh, healthy ingredients. We would buy whatever produce we could find and then create those pool side snacks from our haul. This Panzanella Summer Salad would have been the perfect addition to our pool side spreads that summer.

Panzanella Summer Salad

The base of a traditional panzanella is lightly toasted pieces of bread with large chunks of tomatoes. You will not a single leaf of lettuce. The beauty from here is that you can add in subtle or bright flavors to compliment those base ingredients. I wanted to add an extra sweetness to my version so I’ve tossed in peaches – such a classic summer ingredient. Even with the pieces of bread tossed in, this salad is light and refreshing. A perfect dish for those summer days spent by the pool.

Tips:

  • Go ahead and make this salad a few hours in advance. The juices of the tomatoes and peaches will start to soak into the bread (without making it soggy). This helps to blend the flavors.
  • This salad is the perfect opportunity to use up any tomatoes that might be overripe. The extra juiciness will only add flavor.

Panzanella Summer Salad

The perfect salad for your summer finds from the farmer's market.
Print Recipe Pin Recipe

Ingredients
  

  • 5 cups rustic multigrain bread, cut into 1/2" cubes
  • 2 Tablespoons extra virgin olive oil
  • 5 medium, ripe tomatoes of mixed variety, cut into 1/2" cubes
  • 2 ripe peaches, cut in half & sliced thin
  • 1/2 small red onion, cut in half and sliced thin
  • 10 large basil leaves cut into thin strips

For the salad dressing

  • 1/2 cup extra virgin olive oil
  • 1/2 teaspoon dijon mustard
  • 3 Tablespoons white wine vinegar
  • 1/2 teaspoon salt
  • 1/4 teaspoon ground black pepper

Instructions
 

  • Preheat oven to 375°F. Spread bread pieces out on a sheet pan and drizzle with olive oil. Bake 6 minutes or until lightly toasted, not browned. Remove from oven and let cool.
  • In a large bowl, gently toss together toasted bread with
    tomatoes, peaches, red onion and basil.
  • For the salad dressing, whisk all ingredients in a small
    bowl. Drizzle over salad as desired.

Notes

If you can’t find a rustic multigrain bread, swap it out for another hearty loaf of your choosing such as ciabatta or sourdough. 

Filed Under: Recipe, Sides, Uncategorized Tagged With: bread, Panzanella, Panzanella Salad, Panzanella Summer Salad, Peaches, Side Dish, Summer Salad, Tomatoes

LEMON HUMMUS with ROSEMARY PITA CHIPS

May 4, 2019 by Sarah Baade 3 Comments


I’m an introvert… most of the time. We all have our moments of being outgoing, right? I have no problem taking charge during appointments at work. I can lead a camp song like I was born to do it. Even public speaking doesn’t bother me much. Growing up though, I was a painfully shy child. I can remember hiding behind my parents’ legs or behind furniture just to avoid interacting with people. Even now, my natural instinct is to cuddle up at home and watch a movie or spend time with my family. But life really is about balance. I have extrovert friends who I know I can call at the last minute when I really want to get out and do something. I don’t think those friends even realize how much they help me to break out of my routine and reach for my goals.

A few months ago, I heard about a new group here in San Antonio called Florecer Femme.  This is really a community of women who support and encourage one another to flourish and become strong female leads of their own lives.  When I saw they were having a launch event last November, I immediately knew that I wanted to go. I connected with one of my extrovert friends and we purchased our tickets to attend the event. Then it happened, my friend ended up not being available to go with me. The introvert in me panicked a little bit and made up excuses for not going alone. I ultimately channeled the outgoing side of my personality and boldly walked through the doors of that event all on my own. I’m not saying networking in a room full of people who brought their own friends was easy but it was definitely doable and it formed some relationships. Here I am, six months later, creating light refreshments for the latest Florecer Femme event.  I hope that my own experience can give you courage to walk confidently into whatever might be intimidating you and take charge of your own path. Make those connects, start that project, ask for that promotion. However you are looking to grow, I believe you are capable!


For the Florecer Femme event, I served Lemon Hummus with Rosemary Pita Chips (seen below), Rainbow Fruit Salad, and Honey Date Nut Bars. If you have tried these recipes, I’d love to hear from you! You can comment below or tag me on Instagram @sliceofhoney #sliceofhoney.

Tips:

  • If you don’t have a food processor, you can blend the hummus in a blender just don’t go overboard or you’ll liquefy it.
  • For the pita chips, you can use dried or fresh rosemary. If using dried, you’ll want to add a little extra to make sure you get the full flavor of the herb.

Lemon Hummus

Print Recipe Pin Recipe

Ingredients
  

  • 15 oz can chickpeas, drained & rinsed
  • 2 Tablespoons tahini
  • 1/3 cup olive oil
  • 1/4 teaspoon salt
  • 3/4 teaspoon garlic powder
  • 1/2 teaspoon onion powder
  • zest & juice of 2 small lemons

Instructions
 

  • In a food processor, blend all ingredients until smooth.

Rosemary Pita Chips

Print Recipe Pin Recipe

Ingredients
  

  • 2 whole wheat pita breads
  • 3 Tablespoons olive oil
  • 1 teaspoon fresh rosemary
  • 1 teaspoon flaked salt
  • 1 teaspoon paprika

Instructions
 

  • Preheat oven to 375°F.  
  • Cut pita bread in half so that you have single layer rounds then cut each round into 6 wedges.
  • Place wedges on a sheet pan and brush each wedge lightly with olive oil.
  • Sprinkle rosemary, paprika and salt over wedges. 
  • Bake 6-7 minutes or until golden brown and lightly crisp.
  • Let cool before serving.

Filed Under: Recipe, Sides, Uncategorized Tagged With: Healthy Option, Healthy Snack, Hummus, Lemon, Lemon Hummus, Pita Chips, Rosemary, Side Dish, Slice Of Honey, Snack

CELEBRATION PANCAKES

March 28, 2019 by Sarah Baade 3 Comments

Celebration Pancakes - Slice Of Honey

When I was a kid, my dad would get up early and make a hot breakfast for us every day. I didn’t realize how lucky I was until I talked to a friend at school who said her mom just had a variety of cereal to choose from each morning. Here’s the thing though, I rarely ate it. It was always delicious but I’ve never been much of an early morning breakfast person. I just didn’t wake up hungry; I needed to be up for a couple of hours before I was ready to eat. Now that I’m a mom myself, I have an extra appreciation for Dad’s cooking. He could whip up biscuits and sausage gravy, scrambled eggs, pancakes… all the traditional breakfast items. He also taught me that pancakes freeze really well. He would make a huge batch all at once and freeze half of them for us to eat later on. I still do this every time I make pancakes. I love being able to heat up homemade pancakes from the freezer whenever I’m craving breakfast or just don’t have the energy to cook.

Celebration Pancakes - Slice Of Honey

Let me start by saying there is a special place in my culinary heart for pancake mixes – “just add water”. However, there are days when I have run out of pancake mix and don’t want to run to the store for that one single item. The beauty of homemade pancakes is that you probably already have all of the ingredients in your kitchen. We only need the basics here and you can still end up with super fluffy pancakes. On an extra special day such as a birthday or your kid aced a test or maybe your spouse got a promotion, take things up a notch and add sprinkles. I’ve said it before and I’ll say it again, sprinkles bring joy! And yes, in my house, sprinkles are just as much a pantry staple as flour or sugar. You never know when you’ll want to spark a little extra joy so just keep those rainbow sprinkles stocked at all times!

Celebration Pancakes - Slice Of Honey

Tips:

  • Definitely melt the butter before you start mixing any ingredients. This will allow it to cool before you add the eggs so that you don’t end up with a scrambled egg batter.
  • Keep the heat on medium to medium low. I know it is tempting to crank it up to get things cooking faster but you’ll just end up with pancakes that are burnt on the outside and raw on the inside.

CELEBRATION PANCAKES

Homemade pancakes with a little extra joy.
Print Recipe Pin Recipe
Servings 12 pancakes

Ingredients
  

  • 2 1/2 cups all-purpose flour
  • 1 Tablespoon baking powder
  • 1 teaspoon baking soda
  • 1/4 teaspoon salt
  • 2 Tablespoons sugar
  • 4 Tablespoons unsalted butter, melted and cooled
  • 2 cups milk
  • 1 teaspoon vanilla extract
  • 1 egg, beaten
  • 1/4 cup rainbow jimmies/sprinkles
  • Optional toppings: butter, maple syrup, whipped cream, more sprinkles

Instructions
 

  • Heat a lightly oiled griddle over medium heat.
  • In a large bowl, whisk together the flour, baking powder, baking soda, salt and sugar. Stir in the melted butter, milk and vanilla. Stir in the egg and then the sprinkles. 
  • Scoop about a ¼ cup of batter onto the heated griddle. Depending on the size of your griddle, you can make more than one pancake at a time. Cook until batter starts to bubble on top and bottom is golden brown. Flip and continue cooking until the second side is also golden brown (about 1 minute). Remove from griddle and continue this process until all batter is used.

Filed Under: Recipe, Uncategorized Tagged With: breakfast, Breakfast Recipe, Brunch, Brunch Recipe, Celebration, Homemade Pancakes, Pancakes, Recipe, Sprinkles, Vegetarian

SWEET TURMERIC ROASTED VEGETABLES

March 4, 2019 by Sarah Baade 3 Comments

Sweet Turmeric Roasted Vegetables - Slice Of Honey Blog

Throughout college I spent my summers working at YMCA residential summer camps. While working at Camp Cosby, we would have snacks for the staff who had a little time off in the evenings. Leftover desserts from dinner, potato chips, I even learned to love cheesy toast (literally just sandwich bread with a slice of cheese on it, toasted up in the oven). Since my specialty in the kitchen was baking, I made a blackberry cobbler one evening – made from fresh blackberries we had picked that week. It was such a treat to have a made from scratch dessert but it wasn’t the most impressive snack we had that summer. There were two staff members from New Orleans who whipped up some fried chicken for us like it was no big deal. I watched them gathering spices and I was amazed by how they knew exactly what they needed and/or knew which spices would go well together. I had never seen someone my own age put a dish together like that without a recipe. Not only that, it was some of the best fried chicken I’ve ever had.

Sweet Turmeric Roasted Vegetables - Slice Of Honey Blog

Fast forward 15+ years and I’ve become more confident in exploring spices and using my pantry to the best of my ability. I love roasting vegetables but I’ve been needing to get out of a flavor rut with them. I’ve been wanting to try and incorporate turmeric so I just went for it, adding some additional spices and a little bit of honey. Guys, I shamelessly ate the ENTIRE pan of vegetables!!! Sure, these experiments don’t always turn out on a first go or even a fifth go but when they do it totally makes up for the frustrating moments that can happen in the kitchen. I hope you are encouraged by this recipe to explore your pantry or spice rack and try something new.

SWEET TURMERIC ROASTED VEGETABLES

Sarah Baade
Lightly sweetened with spices and honey, you'll love these roasted vegetables!
Print Recipe Pin Recipe
Course Side Dish

Ingredients
  

  • 1 large head cauliflower, cut into florets
  • 3 carrots, peeled and cut into 1/2" slices
  • 1 Tablespoon olive oil
  • 1 teaspoon ground turmeric
  • 1/2 teaspoon ground cinnamon
  • 1/2 teaspoon ground coriander
  • 1/4 teaspoon ground black pepper
  • 2 teaspoons honey
  • 1 teaspoon sesame seeds

Instructions
 

  • Preheat oven to 400°F.
  • Place cauliflower and carrots in a large bowl and drizzle with olive oil. Stir until vegetables are evenly coated with oil.
  • In a small bowl, mix turmeric, cinnamon, coriander and black pepper. Add spices to vegetables and stir until evenly coated. Spread vegetable mixture onto a sheet pan and roast in the oven for 20 minutes or until vegetables are for tender, stirring halfway through cooking.
  • Drizzle vegetables with honey and sprinkle with sesame seeds.
Keyword Roasted Vegetables, Sweet Turmeric Roasted Vegetables, Turmeric, Vegetables

Filed Under: Recipe, Sides, Uncategorized Tagged With: Easy Recipe, Easy Side Dish, eat healthy, Healthy Food, healthy side dish, Side Dish, Vegetables, Vegetarian, Vegetarian Recipe

  • « Previous Page
  • Page 1
  • …
  • Page 3
  • Page 4
  • Page 5
  • Page 6
  • Page 7
  • Page 8
  • Next Page »

Primary Sidebar

Connect With Me

  • Bloglovin
  • Facebook
  • Instagram
  • Pinterest

Follow Blog via Email

Enter your email address to follow this blog and receive notifications of new posts by email.

Archives

Copyright © 2023 Slice Of Honey on the Foodie Pro Theme


Loading Comments...