• Skip to primary navigation
  • Skip to content
  • Skip to primary sidebar

Slice Of Honey logo

  • Home
  • About
  • Contact
  • breakfast
  • Dinner
  • Side Dish
  • Dessert
  • Other
  • All Recipes

Recipe

Watermelon Salad

August 1, 2018 by Sarah Baade 3 Comments

I keep wondering if I’m getting wimpier with age or if this summer really has been excruciatingly hot. I’m leaning toward the latter but the honest answer is that it’s probably both. I’ve been thinking back on all those summers I spent working at YMCA camps (shout out to Camp Wood and Camp Cosby!) and wondering how I survived living in little cabins with no air conditioning. I’m confident that I survived by being preoccupied with lots of fun activities and friends. I mean, who has time to think about the heat when you’re guiding a group of kids through a mud hike?! Still, we’ve been hitting triple digit temperatures on a daily basis with not much relief in sight. I give a lot of credit to all the summer camp staffers out there who have pushed through this heat to give kids the best week(s) they could imagine.

Watermelon Salad - Slice Of Honey Blog

When it’s this hot outside, I have no interest in turning on the oven. Simple fresh ingredients are the way to go and summer provides such delicious seasonal produce! Naturally, I had to use this to my advantage. My daughter has been on a watermelon kick lately so I opted to use that as my base. I’m all about use what you’ve already got at home when possible. With just five ingredients, the hardest part of this salad will simply be cutting the watermelon. Other than that, this is as easy as a recipe can get. Enjoy!

Watermelon Salad - Slice Of Honey Blog


Tips:                                                                                           

  • Although more expensive, you can certainly buy pre-cut watermelon to make this recipe even easier to make.
  • You can certainly toss the salad together a day ahead. Just be sure to cover and store in the refrigerator and don’t add the salad dressing until you are ready to serve it.
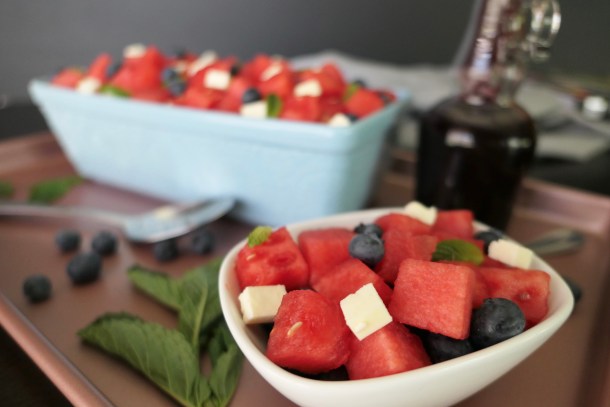
 

P1030510 

Watermelon Salad

Salad:

8 cups watermelon, cut into bite sized pieces

2 cups blueberries

½ cup feta cheese, crumbled or cubed

1 Tablespoon fresh mint, chopped


Dressing:

1 cup blueberries

¼ cup balsamic vinegar


Directions:

In a large bowl, toss together all of the salad ingredients. In a blender, liquefy the dressing ingredients. Drizzle dressing over individual servings of salad, as desired.


Watermelon Salad - Slice Of Honey Blog


Filed Under: Healthy Option, Recipe, Sides, Uncategorized Tagged With: Appetizer, Easy Recipe, Fruit, Fruit Salad, Gluten Free, Seasonal Food, Side Dish, Snack, Summer Salad, Vegetarian, Watermelon

Savory Spinach Turnovers

July 15, 2018 by Sarah Baade 5 Comments

Savory Spinach Turnovers - Slice Of Honey Blog

Is there actually a better meal out there than brunch? The combination of savory and sweet breakfast items plus lunch is arguably perfect. It is also the only time adding a little booze to your diet before noon is not just acceptable but encouraged. Hello mimosas and bloody Marys! Next month I will be helping to host a baby shower with brunch so I’ve had all sorts of ideas running through my head. The hardest part of menu planning will be narrowing down our options.

Savory Spinach Turnovers - Slice Of Honey Blog

I can’t quite decide what I like best about this recipe. It is incredibly easy to make with just 8 ingredients. But the bonus is that it would be great served at a brunch or as a grab and go option on a busy morning. I actually made these on a weeknight and then brought them to the office the next morning to share. My co-workers happily grabbed one to take back to their desks as a mid-morning pick me up.

Savory Spinach Turnovers - Slice Of Honey Blog

Savory Spinach Turnovers

Sarah Baade
Print Recipe Pin Recipe
Course Breakfast, Brunch, Side Dish, Snack
Servings 8 turnovers

Ingredients
  

  • 10oz frozen, chopped spinach (thawed)
  • 1/2 cup ricotta cheese
  • 1/4 cup shredded mozzarella cheese
  • 1/2 teaspoon minced garlic
  • 2 Tablespoons shallots, chopped
  • 1/4 teaspoon salt
  • 2 sheets ready to bake puff pastry, thawed
  • 1 egg, beaten

Instructions
 

  • Preheat oven to 400°F and line a baking sheet with parchment paper.
  • Drain spinach of any excess water. In a medium bowl, stir together spinach, ricotta cheese, mozzarella cheese, garlic, shallot and salt.
  • Unfold sheets of puff pastry. Cut each sheet into four equal squares. Place 2 Tablespoons of spinach mixture into the center of each pastry square. Fold each pastry square diagonally over spinach.   Pinch edges of dough together with a fork. Brush the tops and sides of each turnover with the beaten egg.
  • Place each turnover on the lined baking sheet. Bake 16-18 minutes or until pastry is golden brown.

Notes

Tips:                                                                                            
  • You can make the filling a day ahead and refrigerate it until ready to use.
  • If you have whole frozen spinach on hand, you can chop it yourself rather than buying the pre-chopped.
Keyword Puff Pastry, Savory Spinach Turnovers, Spinach, Spinach Turnovers, Turnovers
Savory Spinach Turnovers - Slice Of Honey Blog

Filed Under: Entree, Recipe, Sides, Uncategorized Tagged With: Appetizer, Baking, breakfast, Brunch, Cheese, Puff Pastry, Side Dish, spinach, Turnovers, Vegetables, Vegetarian, Vegetarian Recipe

Strawberry Float

July 1, 2018 by Sarah Baade Leave a Comment

Happy Independence Day!!! I have celebrated this holiday from all over the country – Kansas, Texas, Colorado, Alabama… I’ve watched fireworks lakeside, mountainside and from my own driveway. However, my favorite memories of this holiday are from my grandparents’ backyard. As a kid, we would drive down from Kansas to Texas to visit my grandparents. They would have what seemed like an endless supply of sparklers and popper for us to light up after it got dark. All of us kids would line up out in the yard, a few feet in front of Grandpa’s giant vegetable garden, and write our names in the night sky with the sparklers. Aside from summer camp, this has got to be one of my all-time favorite summer memories.

Strawberry Float - Slice of Honey Blog

This year, I’m keeping the holiday low-key. My little one is too little to play with sparklers and I won’t be staying up late since I’ll need to be at work the next day. But I still want a festive treat. Making the ice cream ahead of time means all I have to do is scoop and pour some soda for this one. I opted for fresh strawberries since they are readily available this time of year. And in the continued effort to keep things simple, this is a no-churn ice cream. You’re welcome!

Strawberry Float - Slice of Honey Blog

Tips:                                                                                            

  • Make sure the strawberry syrup has completely cooled before you add it to the cream mixture.
  • The homemade syrup is really delicious – it would also be fantastic poured over any vanilla ice cream for a sundae.

Strawberry Float - Slice of Honey Blog

Strawberry Float

¼ cup sugar

¼ cup balsamic vinegar

16oz fresh strawberries, de-stemmed and finely chopped

16oz heavy cream

1 teaspoon vanilla extract

14oz sweetened condensed milk

Strawberry soda (I used a passion fruit & strawberry Italian soda)


Directions:

Place sugar, balsamic vinegar and half of the strawberries in a small sauce pan. Bring to a boil over medium high heat, stirring frequently. Reduce heat to low and simmer until liquid has reduced by half. Set aside to let cool.

In a large, cold bowl, beat heavy cream until soft peaks form. Stir in vanilla, sweetened condensed milk, cooled syrup and remaining fresh strawberries. Pour ice cream into a 9×5 loaf pan. Cover with plastic wrap and freeze for a minimum of 6 hours, preferably overnight.

Place 2 scoops of the strawberry ice cream into a glass. Fill glass with strawberry soda until ice cream is covered and starts to foam. Serve with a straw or spoon.

Filed Under: Recipe, Uncategorized Tagged With: Dessert, Drinks, Fruit, Holiday Dessert, Homemade Ice Cream, Ice Cream, Strawberries, Strawberry Float, Vegetarian

Cherry Limeade Popsicles

June 22, 2018 by Sarah Baade 5 Comments

Cherry Limeade Popsicles - Slice of Honey Blog

It is now officially SUMMER!!! And I am celebrating with popsicles. We have been reaching 90’s and even into triple digit temperatures for a few weeks already. I can’t even think about how hot it will be by mid-summer. Over Memorial Day weekend we were visiting family and the kids were all hanging out on the back porch sharing popsicles. Sticky hands and faces, bright red/purple/blue lips, and huge smiles all around. I love how such a simple treat can bring pure joy.


I’ve been trying out a few different popsicle recipes ever since my parents gifted me a nice set of molds. I think their goal was for me to recreate a sangria popsicle we had a while back at a restaurant. I’m sure I’ll get to that before too long but right now I’m focused on non-alcoholic popsicles so my little one can partake. This cherry-lime-aide is my favorite flavor so far. I’m sure this could easily incorporate some wine on the next go-round. (Mom, Dad – I’ve got you covered.)

Cherry Limeade Popsicles - Slice of Honey Blog

Tips:

  • I’m going to be honest, I used frozen cherries for this one because they were already pitted – I’m all about less work when it can still create a delicious result!
  • If the popsicles are sticking to the molds, briefly run them under cold water, they should loosen right up without actually melting.


Cherry Limeade Popsicles

Makes 6 popsicles


1 cup sweet red cherries, pitted

1/3 cup fresh squeezed lime juice

1/2 cup sugar

1 cup water


Directions:

In a small saucepan, over medium heat, stir together all four ingredients. Continue stirring until all sugar has dissolved. Remove from heat and pour fruit mixture into a blender. Blend on high until all ingredients are liquefied. Pour mixture into popsicle molds and freeze overnight.


Cherry Limeade Popsicles - Slice of Honey Blog


Filed Under: Recipe, Uncategorized Tagged With: Cherry, Cherry Limeade, Dessert, Fruit, Lime, Popsicles, Sweets, Vegan, Vegetarian

Portobello Lettuce Wraps

June 11, 2018 by Sarah Baade Leave a Comment

Portobello Lettuce Wraps - Slice Of Honey Blog

Last month was full of traveling. My husband, daughter and I flew out to Oregon to visit family for a few days. Then I flew to Seattle, WA for a work training. The following week we drove to Kansas to visit more family. I am incredibly thankful for these opportunities but it also completely wore us out. I can’t help but think the exhaustion is partly due to a shift in diet. Whenever I travel I end up eating more junk food than I normally would – certainly more than I should. I’m not alone in this habit, right?!?

Portobello Lettuce Wraps - Slice Of Honey Blog

Now that I’m back home I’m craving healthy food. I always find the easiest way to eat healthy is to cook at home. When I’m coming up with recipes I typically start with what type of dish I want to make and then figure out the details and ingredients. However, this particular recipe started with the sauce. I actually tried it out on some peeled carrots and it tasted pretty great (give it a try if you need an easy salad) but it wasn’t quite what I wanted as a final product. After some brainstorming, I came up with these lettuce wraps. This is such an easy dish to make, it might just make it onto my regular dinner menu rotation.

Portobello Lettuce Wraps - Slice Of Honey Blog

Tips:

  • You can easily make the sauce the night before and then refrigerate it until you are ready to use it.
  • The easiest way to crumble the tofu is to do it by hand. Alternatively, you could put the tofu in a bowl and break it apart with a fork.


Portobello Lettuce Wraps - Slice Of Honey Blog

Portobello Lettuce Wraps

Serves 4

½ cup balsamic vinegar

½ cup + 1 Tablespoon olive oil

2 teaspoons ginger, finely chopped

2 Tablespoons peanut butter

½ teaspoon salt

16oz firm tofu,

4 medium Portobello mushrooms, rinsed, stemmed & chopped

2/3 cup water chestnuts, chopped

½ teaspoon crushed red pepper flakes (optional)

2 heads of bib or butter lettuce

Optional additions: rice, crushed peanuts, sliced green onion.

Directions:

In a small saucepan, over low heat, whisk together balsamic vinegar, ½ cup olive oil, ginger, peanut butter and salt until ingredients are fully combined. Remove from heat.

Press tofu with a paper towel to absorb moisture. In a large pan, heat remaining 1 tablespoon of olive oil over medium heat. Crumble tofu into pan and sauté until it starts to brown. Stir in mushrooms and continue to sauté until mushrooms are tender. Reduce heat to low, stir in water chestnuts, crushed red pepper and sauce.

Spoon rice and mushroom filling into lettuce leaves and garnish with peanuts and green onions.

Portobello Lettuce Wraps - Slice Of Honey Blog

Follow my blog with Bloglovin

Filed Under: Entree, Healthy Option, Recipe, Uncategorized Tagged With: Dinner, Gluten Free, Gluten Free Recipe, Healthy Food, Letuce Wraps, Lunch, Mushrooms, Tofu, Vegan, Vegan Recipe, Vegetarian, Vegetarian Recipe

No Churn Chocolate Chunk Coffee Ice Cream

May 22, 2018 by Sarah Baade 2 Comments

No Churn Chocolate Chunk Coffee Ice Cream - Slice Of Honey Blog

I have so many wonderful memories that include ice cream! Clearly a sign of a happy childhood. A sign of a happy adulthood, while we’re at it! Blizzard dates with high school friends and clown cones for my 7th birthday party were awesome but the best memories are with my grandfather. He would pull out the big crank churn and help us make homemade ice cream. It felt like it took hours of churning and adding more salt and more ice. But the reward was always worth the wait. Fresh from the churn, it was like soft serve ice cream. I always added chocolate syrup on top and Grandpa would help me scrape every last bit from my bowl.

No Churn Chocolate Chunk Coffee Ice Cream - Slice Of Honey Blog

Those memories with Grandpa are incredibly sweet. However, as a career woman, a wife and a mom, I don’t have the patience to wait on ice cream to churn. When I saw the no-churn ice cream trend I knew I had to try it. The basic concept is combining whipped cream with sweetened condensed milk. Beyond this, the flavor combinations are limited only by your own imagination. The coffee flavor I’ve created here seems to me like a great excuse to have ice cream for breakfast.

No Churn Chocolate Chunk Coffee Ice Cream - Slice Of Honey Blog
P1020950

Tips:

  • If you’re caffeine sensitive, feel free to use decaf instant coffee rather than regular.
  • Be sure whip the heavy cream yourself rather than using premade whipped cream. There is a difference in texture and sweetness.
No Churn Chocolate Chunk Coffee Ice Cream - Slice Of Honey Blog

No Churn Chocolate Chunk Coffee Ice Cream

Coffee flavored ice cream with dark chocolate chunks – no ice cream churn required.
Print Recipe Pin Recipe
Course Dessert
Cuisine American

Ingredients
  

  • 1 single serving packet instant coffee granules (I used Starbucks Via)
  • 1 Tablespoon hot water
  • 16 oz heavy cream
  • 1/2 teaspoon vanilla extract
  • 14 oz sweetened condensed milk
  • 1/2 cup dark chocolate, roughly chopped

Instructions
 

  • In a small bowl, stir coffee and hot water until coffee dissolves. Set aside.
  • In a large, cold bowl, beat heavy cream until soft peaks form.
  • Stir vanilla and sweetened condensed milk into coffee until well combined. Beat coffee mixture into whipped cream then stir in chocolate.
  • Pour ice cream into a 9×5 loaf pan. Cover with plastic wrap and freeze for a minimum of 6 hours, preferably overnight.
Keyword Coffee, Coffee Ice Cream, Dessert, Dessert Recipe, Ice Cream, Ice Cream Recipe, No Churn Chocolate Chunk Coffee Ice Cream, No Churn Ice Cream
No Churn Chocolate Chunk Coffee Ice Cream - Slice Of Honey Blog

Filed Under: Recipe, Uncategorized Tagged With: Chocolate, Coffee, Dark Chocolate, Dessert, Homemade Ice Cream, Ice Cream, No Churn Ice Cream, Sweets, Vegetarian, Vegetarian Dessert, Vegetarian Recipe

Flight of Mocktails

May 12, 2018 by Sarah Baade 2 Comments

Flight Of Mocktails - Slice Of Honey Blog

I’ve reached an interesting stage of life where friends are not consuming alcohol like we used to. The reasons seem to vary greatly – pregnancy, health issues, recovering alcoholic. Regardless of the reason though, let’s just admit that we would all be a bit healthier if we went for a mocktail rather than some booze. When I was pregnant, I would ask bartenders to create a mocktail for me when I was out to dinner with friends. Maybe it was pregnancy brain getting the best of me but it never really occurred to me to create some mocktails of my own at home. Now that I’ve made a few I’m actually inspired to make and drink more of them!

Flight Of Mocktails - Slice Of Honey Blog


The inspiration on this flight of mocktails was really to create drinks comparable to cocktails I would normally order myself at a bar or restaurant. I enjoyed all four drinks listed here but the first two are my favorite. These could be so fun to serve at a baby shower or even just a booze-free brunch with friends!


Flight Of Mocktails - Slice Of Honey Blog

Tips:

  • If added sweetness is desired for the Pink Lemon Drop, serve in a sugar rimmed martini glass.
  • You can buy or make your own simple syrup. To make your own, add ½ cup sugar and ½ cup water to a saucepan over medium heat. Stir until sugar is completely dissolved. Let cool completely before adding to your mocktail.

Flight Of Mocktails - Slice Of Honey Blog

Flight of Mocktails


Sober Sangria – makes 4 drinks

1 orange, sliced

1 apple, sliced

1 lemon, sliced

1 peach, sliced (in winter, you can sub the peach out for 1 cup pomegranate seeds)

1 cinnamon stick

1 ½ cups pomegranate juice

juice of 1 lime

1 cup cranberry juice


Place all fruit and the cinnamon stick in a pitcher. Pour in pomegranate juice, lime juice and cranberry juice. Stir all ingredients and refrigerate a minimum of 4-8 hours in order to allow flavors to blend and drink to chill. Can be served over ice if desired.


Pink Lemon Drop Mocktini – makes 1 drink

¼ cup cranberry juice, chilled

½ cup Italian lemon soda, chilled

2 fresh ginger slices

1 small sprig rosemary

Optional garnish – 1 lemon slice


Pour juice and soda into a martini glass. Place ginger slices on a toothpick then place in drink. Add rosemary and lemon slice.


Mock-Mojito – makes 1 drink

2 tablespoons simple syrup

Juice of 1 lime

1 sprig fresh mint

¾ cup Topo Chico (or plain carbonated water of choice)

Crushed ice


In a 10oz glass, stir together simple syrup, lime juice, Topo Chico and mint. Add crushed ice until glass is full. Garnish with more mint if desired.


Berry Sunrise – makes 1 drink

1 handful blueberries (or opt for blackberries, raspberries or sliced strawberries)

½ cup grapefruit juice

½ cup sprite

Crushed ice


Muddle berries in the bottom of a 10oz glass. Stir in grapefruit juice and sprite. Add crushed ice until glass is full.


Flight Of Mocktails - Slice Of Honey Blog


Filed Under: Recipe, Uncategorized Tagged With: Alcohol Free, Cocktails, Drinks, Flight of Drinks, Fruit, Mocktails, Mocktini, Mojito, Sangria

Market Couscous Salad

April 28, 2018 by Sarah Baade Leave a Comment

Market Couscous Salad - Slice Of Honey Blog

The weather is finally getting warm again and I am looking forward to scouring my local farmers market for my favorite summer produce. In particular, I’m already craving fresh tomatoes and cucumbers. I feel fortunate to have access to most produce all year long at my local grocery store but there is something special about meeting your local farmers and buying their fresh from the farm products.

With warm weather also comes outdoor potlucks. The great thing about this dish is that it can be served warm or cold (I actually prefer it cold). With just ten ingredients, this dish is easy to put together and you can make it ahead of time.

Market Couscous Salad - Slice Of Honey Blog


Tips:

  • Don’t feel limited by the grape/sweet tomatoes I used here. Grab whatever is freshest at your local farmers market or grocery store. Even better would be homegrown tomatoes!
  • Make sure you add that 1 teaspoon to the water as you’re cooking the couscous – it helps to keep it from turning into one huge blob as it cools.

Market Couscous Salad - Slice Of Honey Blog


Market Couscous Salad

Ingredients:

1 teaspoon + 1 Tablespoon olive oil

1 cup uncooked pearl coucous (I used tri-color)

¼ cup red wine vinegar

½ teaspoon salt

½ teaspoon fresh thyme

1 cup cucumber, chopped

1 cup tomatoes, chopped (I used a mix of sweet tomatoes)

¼ cup red onion, chopped

2 cloves garlic, minced

¼ cup crumbled feta cheese


Directions:

In a medium pot, bring 1 ½ cups water and 1 teaspoon olive oil to a boil. Add couscous then reduce heat and simmer for 7-9 minutes or until water is absorbed and couscous is tender. Remove from heat. Add remaining ingredients to couscous and stir until ingredients are evenly dispersed. Salad can be served warm or cold.

Market Couscous Salad - Slice Of Honey Blog

Filed Under: Healthy Option, Recipe, Uncategorized Tagged With: Cheese, Couscous, Dinner, Easy Dish, Easy Recipe, Easy Side Dish, Lunch, salad, Side Dish, Vegetables, Vegetarian, Vegetarian Recipe

Potato Chip Cookies

April 16, 2018 by Sarah Baade 1 Comment

Potato Chip Cookies - Slice Of Honey Blog

As I look through my grandmother’s recipe box, I realize that she saved far more dessert recipes than any other kind. I can relate! For years, I have cut out recipes and carefully taped them into notebooks by category. I have a notebook for main dishes, one for sides and one for drinks. Each of these is partially filled. Then I have two notebooks for desserts that are overflowing. No lie, I have loose cut out recipes tucked away in the back of each one. Perhaps it is time for another notebook? I clearly started this habit pre-Pinterest but I still enjoy flipping through those pages and seeing the “love” (okay, mess) and notes that I made on some of those recipes. You know it is a really good one if there are stains all over it!

Potato Chip Cookies - Slice Of Honey Blog

So as to live up to my grandmother’s standards, I decided it was time to make another dessert. There are so many to choose from in that recipe box and eventually I hope to get to most of them – have no fear, I will not resort to the shrimp Jello recipe I found. I’ve been wanting something unique rather than classic lately so I’ve opted to update her recipe for potato chip cookies.  After a quick google search, I learned that this is more common than I thought (even Martha Stuart has a recipe for them!) but the butterscotch chips set this recipe apart from any other I’ve seen.

Potato Chip Cookies - Slice Of Honey Blog

Tips:

  • If you’re not a fan of butterscotch, swap those chips out for chocolate.
  • I used plain ridged potato chips for this recipe. I placed them in a large zip lock bag and then rolled over them with a rolling pin until they were evenly crushed.

Potato Chip Cookies - Slice Of Honey Blog


Potato Chip Cookies

Makes 4 ½ dozen cookies


Ingredients:

1 cup unsalted butter, softened

1 cup packed brown sugar

1 cup white sugar

2 eggs

2 teaspoons vanilla

2 cups flour

1 teaspoon baking soda

11oz package of butterscotch chips

2 cups crushed potato chips


Directions:

Preheat oven to 350°F and line a cookie sheet with parchment paper.

In a large bowl, cream together butter, brown sugar and white sugar. Beat in eggs then stir in vanilla and baking soda. Gradually mix in flour. Stir in butterscotch chips then stir in crushed potato chips.

Scoop teaspoon-sized mounds of cookie dough onto lined cookie sheet, leaving 2-inches between the cookies. Bake for 7 to 8 minutes or until edges begin to turn golden brown. Remove the cookie sheet from the oven and transfer the cookies to cooling racks.

Potato Chip Cookies - Slice Of Honey Blog

Original recipe source unknown. Recipe has been modified from this version for the purpose of this blog.

Filed Under: Grandma's Recipe Box, Recipe, Uncategorized Tagged With: Baking, Butterscotch, Butterscotch Chips, Cookies, Cooking at Home, Dessert, Home Cooking, Homemade, Homemade Cookies, Potato Chips, Sweets

Honey Date Nut Bars

April 8, 2018 by Sarah Baade 2 Comments

Honey Date Nut Bars - Slice Of Honey Blog

Last week we had family in town for Easter. I had every intention of cooking a couple of vegetarian dinners but ultimately did not cook one single meal at home. I have no regrets though! Ultimately, the time I would have spent cutting vegetables or creating a sauce was spent having amazing conversations. I love cooking but I love quality time with family even more.

Honey Date Nut Bars - Slice Of Honey Blog

A couple of days before our guests arrived, I made these nut bars. I am definitely a grab and go breakfast kind of person. Even as a child, I did not eat a big breakfast. I’m so glad I had these on hand because they provided all of us with a quick, light breakfast or snack when we needed it. You’ll notice that there isn’t any fruit or chocolate in this recipe. It is so hard to find a granola or nut bar without these ingredients which is why I decided to create one of my own. If I really want chocolate, I’ll go grab a cookie. For a light, grab-and-go breakfast, I’ll stick with these nut bars.

Honey Date Nut Bars - Slice Of Honey Blog

Tips:

  • A candy thermometer is recommended for getting the honey to temperature. However, you can also let it get to a rolling boil and then drop a small amount of the hot liquid into a cold cup of water. The honey should become firm and when you pinch it with your fingers it should have very little give.
  • If you aren’t a fan of almonds or macadamia nuts, feel free to sub out for your favorite combination, just keep the measurement ratios the same as what is given in the recipe.

Honey Date Nut Bars - Slice Of Honey Blog

Honey Date Nut Bars

Makes 12 bars


2 cups roasted, unsalted almonds

1 cup roasted, unsalted macadamia nuts, broken into large pieces

3 pitted medjool dates, chopped

½ teaspoon salt

1 teaspoon vanilla extract

1/2 cup honey

1/4 cup pepitas

2/3 cup crispy rice cereal


Directions:

Put almonds, macadamia nuts, pepitas, dates, rice cereal and salt into large bowl and set aside.

In a medium sauce pan, bring honey and vanilla to a rolling boil, stirring constantly until you reach 300°F.

Pour hot honey mixture over nut mixture, stirring to quickly mix the two.

Spread nut mixture evenly over parchment paper lined 9×9 pan. Let cool completely before cutting and serving.

Honey Date Nut Bars - Slice Of Honey Blog

Filed Under: Recipe, Uncategorized Tagged With: Almonds, breakfast, Dates, Honey, Macadamia Nuts, Nut Bars, Nuts, Pepitas, Snack, Vegetarian, Vegetarian Recipe

  • « Previous Page
  • Page 1
  • …
  • Page 5
  • Page 6
  • Page 7
  • Page 8
  • Next Page »

Primary Sidebar

Connect With Me

  • Bloglovin
  • Facebook
  • Instagram
  • Pinterest

Follow Blog via Email

Enter your email address to follow this blog and receive notifications of new posts by email.

Archives

Copyright © 2023 Slice Of Honey on the Foodie Pro Theme


Loading Comments...